To setup and install Node.js on Windows, Ubuntu, or macOS. You need to pick the version of Node.js that you want to install.
Table of Contents
Usually, you have two main choices:
- LTS (Long Term Support) Version: This one is more stable and will have support for a longer period. It’s the best bet if you want fewer surprises and more reliability.
- Current Version: This version has the latest features but is less tested, so it might have a few bugs.
Let’s get started on how to set up Node.js on the Windows operating system.
Setup and Installing Node.js on Windows
First things first, you need to get the Node.js software. It is available on the official Node.js page at: https://nodejs.org/en/download/.
Once you open the link, you will see many installers. Just click on the “Download Node.js” button.
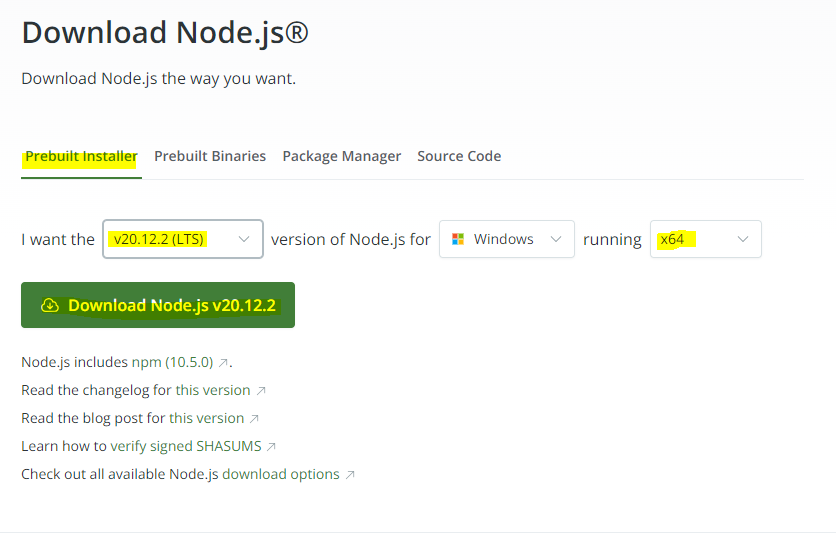
Choose the right installer for your operating system, either x32 bit or x64 bit.
Once the download is complete, open the file to start the installation. Follow the prompts on the screen.
However, make sure to agree to the license agreement and choose the installation folder.
The setup wizard will guide you through a few choices:
- You can just stick with the defaults, which are set to meet the needs of most users.
- When asked, make sure to check the box that says ‘Automatically install necessary tools’ to make your life easier.
After completing the installation, use the Command Line Interface (CLI) to check which version is installed on your operating system by using the following command:
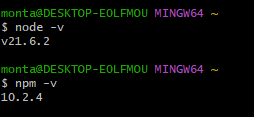
node -vActually, this installer includes the NPM package, which is installed automatically during the process.
To check the NPM version, just run the command below.
npm -vHere is an image showing how to verify the NPM and Node.js versions for each command.
If that is the case, congratulations! You have successfully installed Node.js on Windows. Let’s move on to the following section to learn how to install node.js on Ubuntu.
Installing NPM and Setting Up Node.js on Ubuntu
When you’re ready to dive into JavaScript development on the Ubuntu operating system, setting up Node.js and NPM (Node Package Manager) is your first step.
So, before you install any new software, it is essential to update your package repository. This ensures that you have access to the latest versions and that your installation goes smoothly.
Open your terminal and run this command:
sudo apt updateThis command refreshes your system’s software list and sets the stage for a smooth installation.
Ubuntu’s package repository already contains Node.js, so you can install it directly using the apt package manager. To install Node.js along with npm, use the following command:
sudo apt install nodejs npmThen, you can verify the installation by checking the versions of Node.js and NPM, as mentioned earlier:
node -v
npm -vAnyway, In the following section, you will learn how to install NPM and Node.js on the macOS operating system. Let’s dive in.
Installing Node.js on macOS
Installing Node.js on macOS is similar to installing it on Ubuntu. Follow these steps to install Node.js on macOS:
To begin, open the Terminal on your Mac by pressing Command+Space, then type “Terminal” in the search bar and press Enter. Once the Terminal is open, you can install Homebrew, which is a widely used package manager for macOS, by entering the following command:
/bin/bash -c "$(curl -fsSL https://raw.githubusercontent.com/Homebrew/install/HEAD/install.sh)"Next, you need to enter the following command in the Terminal to install Node.js and npm using Homebrew:
brew install nodeThen, confirm that the installation was successful by checking the versions of Node.js and npm with this command:
node -v
npm -vCongratulations! You have successfully installed Node.js on macOS. In the next section, I will show you another method to install NPM and Node.js on all operating systems using the binary package. Let’s get started.
Install Node.js and NPM Using the Binary Package on Windows
To install or update Node.js using binaries, go to the official Node.js website and choose a binary package that works for your operating system from the list available.
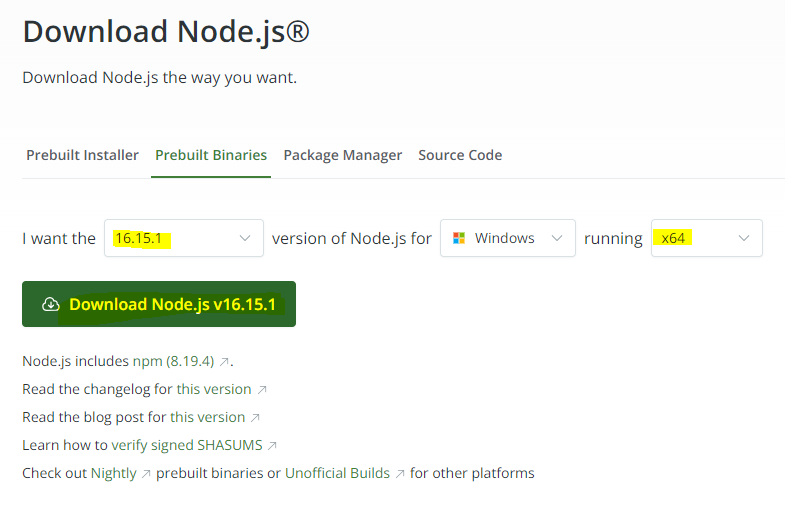
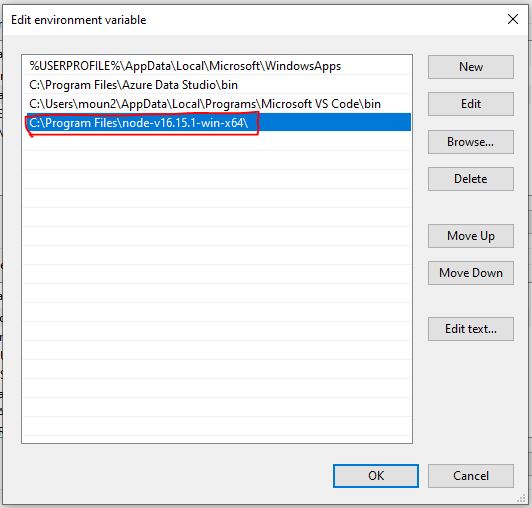
After downloading the necessary package, you need to unzip it. For this example, we downloaded the 64-bit binary package named “node-v16.15.1-win-x64.”.

After moving the folder, copy the path of its new location.

Then, add this path to the Environment Variables by opening the “Environment Variables” window. You can do this by following the below steps:
- Right-click on “My Computer” with your mouse and choose “Properties.”
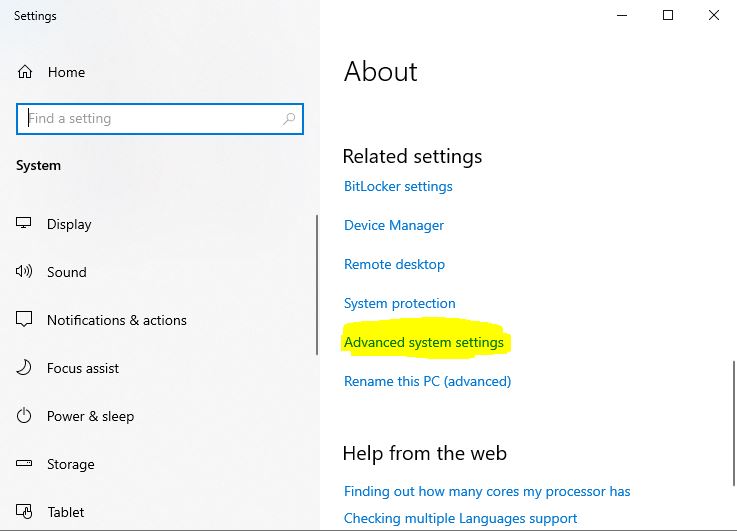
- Scroll down and click on “Advanced System Settings” to open the “System Properties” window.
- Click on the “Advanced” tab and then click the “Environment Variables” button.

Now, click on “Path” and then click the “Edit” button.
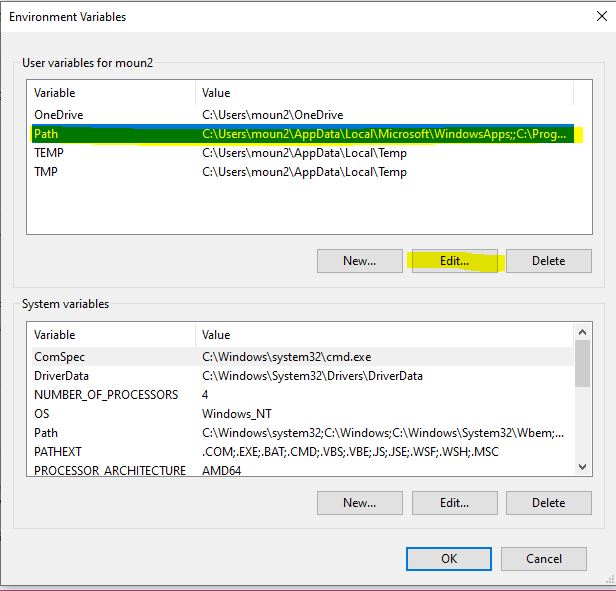
Next, add the new path to the list of variables, as illustrated in the images below.
In the next section, you will learn how to update Node.js using NPM. Let’s move on.
Updating Node.js Using the Node Package Manager (NPM)
NPM, or Node Package Manager, lets you update Node.js with a package from the NPM registry called “n.” This package manages different versions of Node.js. To install “n,” use the command listed in the npm registry.
npm install nTo update or install Node.js using the “n” package, you need to run one of the following commands:
n lts
n latestIn the following section, you will learn another method to update or install a specific version of Node.js on your operating system using NVM.
Set Up or Update Node.js Using Node Version Manager (NVM)
NVM stands for Node Version Manager. This tool helps manage different versions of Node.js. If you have multiple versions installed, you can switch between them using NVM commands.
If you don’t have NVM installed on your computer, go to the NVM tutorial for guidance on how to install it.
Once you have confirmed that NVM is installed on your machine, you can run the following command to install a specific version of Node.js:
-- NVM Command
nvm install {The New Version} --reinstall-packages-from={The Old Version}
-- Example
nvm install 16.15.1 --reinstall-packages-from=10.4Anyway, Let’s move on to the next section to learn how to check the current version of Node.js on your machine.
Verify The Node.js and NPM Installation
Additionally, to check the version of Node.js you downloaded or to ensure the installation was successful, you need to run the following command using the command prompt.
So to open it, go to the Start menu, type “command prompt” in the search bar, and click to open the application.

Here is the command to verify the Node.js installation:
node -vAnd to verify the NPM version, use the following command:
npm -vNPM allows you to update its package on your machine using a global command. Let’s explore how to do that in the following section.
Update Node Package Manager (NPM)
You can use the npm command to update npm itself. If you are using Ubuntu or macOS, please precede the following command with ‘sudo’ to grant administrative privileges.
npm update npm@latest -g
If you look at the image above, you will see a warning message suggesting you use --location=global instead of the outdated -g flag.
Anyway, when you see this warning message, run the below command.
npm update npm@latest --location=globalAccordingly, you will see a new message stating “up to date,” which indicates that we have already installed the latest version of NPM.
Otherwise, it will display a notice listing the updated and removed packages. For example:

Let’s summarize it.
Wrapping Up
The installer of Node.js lets you run JavaScript on your computer. It comes in two main types: LTS Version and Current Version. So the recommended version to install is the LTS version.
Setup Node.js on Windows:
- Download the Installer: Go to the Node.js website (https://nodejs.org/en/download/) and download the installer suitable for your Windows version (32-bit or 64-bit).
- Run the Installer: Open the downloaded file and follow the on-screen instructions. Agree to the license, choose where to install, and let the installer download the necessary tools automatically.
- Check the Installation: After installing, you can check if Node.js is working by typing
node -vin the Command Line Interface to see the version number.
Installing Node.js on Ubuntu
- Open the terminal and update your package list with
sudo apt update. - Use the command
sudo apt install nodejs npmto install both Node.js and NPM. - Then check the version that installed on your machine by this “node -v”.
Installing Node.js on macOS
- Open the Terminal, and install Homebrew by running
/bin/bash -c "$(curl -fsSL https://raw.githubusercontent.com/Homebrew/install/HEAD/install.sh)". - Use Homebrew to install Node.js and NPM by typing
brew install node. - And then check the version using this command
node -v.
Thank you for reading. Happy Coding!